How to migrate your ETL workloads and EDW from Snowflake to Databricks
Introduction
We are observing a growing trend where Enterprises that are reeling off higher than expected ETL compute or consumption costs on Snowflake are migrating to Databricks. This blog is intended for a technical audience on how to migrate from Snowflake to Databricks, either for their data engineering/ETL workloads or both the ETL/data-engineering and the end-state consumption layer in their EDW.
We do recommend customers to keep the consumption layer in Snowflake in the first phase of migration and only migrate the ETL/data engineering layer first. The end state consumption (Gold) layer in Snowflake can be migrated at a later phase.
Traditionally, EDW/ETL migrations of any magnitude can often be complex, long and challenging. However, the transition from Snowflake to Databricks is less complex compared to onPremise EDWs or Hadoop DataLakes for 2 primary reasons:
Snowflake is a Cloud native Data Warehouse and the data pipelines used to hydrate Snowflake were built using modern data engineering technologies and principles ( like SQL, Python and/or dbt), making the data engineering pipelines highly compatible with Databricks for migration. Databricks expands even more on these capabilities.
Databricks has invested and matured significantly as an EDW and their SQL consumption layer, which makes the migration less complex compared to Hadoop or legacy onPremise EDWs.
We have identified five key phases for this migration, which we call M5:

Source: SunnyData
Data Migration
Data Modeling (or Data Model Evaluation)
Code Migration
Data M-Validation (or Data & Pipelines Validation)
Report/BI Modernization
On the other hand, we have evaluated the complexity of each phase using the ❅ symbol in honor of Snowflake, which will give you an idea of the specific challenges you might face at each stage.
Data Migration: (Difficulty: ❅❅ out of ❅❅❅❅❅)
As always, the first step is data migration. We assign it a difficulty of two snowflakes (❅❅) because it is a structured and straightforward process, where you do not have to handle high complexity in terms of creating complex code nor is it a process that generates friction. The only reason we did not assign it a lower difficulty is because the BI Modernization phase can be as easy as unplugging and plugging in when the schema does not change, and that can be done in minutes.
Despite the above, one very important clarification. There are several ways to approach this phase, but we will focus on three:
1. Modern Approach
The first, which is the most recent and simplified, involves setting up Snowflake as a federated data source in Databricks. This allows you to query data stored in Snowflake directly from Databricks without needing to export it to another format. Instead of physically moving the data, Databricks can access it through queries, enabling a smoother and real-time integration. Today is the way to go.
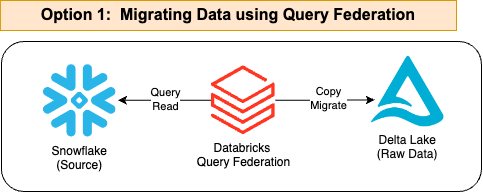
Source: SunnyData
Here is a sample code, but it is really very easy and has no complexity. See the following link: https://docs.databricks.com/en/query-federation/snowflake.html:
CREATE TABLE my_databricks_copy AS
SELECT * FROM my_snowflake_table
2. Traditional Method
The second approach consists of two steps and follows the traditional method. While it is more complex and may seem less relevant today, as data engineers, we still find it worth explaining.
1) Exporting the data from Snowflake to Cloud Storage,
2) Loading the data from Cloud Storage into Databricks.
Exporting Data from Snowflake to Cloud Storage
To migrate data from Snowflake to Databricks, the first step is to copy the data into Cloud Storage (S3, ADLS, or GCS) in Parquet format. To do this, you will need to configure the External Stage and then use the COPY INTO command to download the data from Snowflake tables to cloud storage.
In the following example, we will use AWS as a reference, but the same procedure applies in Azure and Google Cloud.

Source: SunnyData
1. External Stage Configuration
An External Stage in Snowflake is a reference point to an external storage location, such as an S3 bucket, where data can be uploaded or downloaded.
1. A Storage Integration is created, which configures the integration of Snowflake with S3 by specifying the storage provider, the AWS role ARN, and the allowed locations in S3.
CREATE OR REPLACE STORAGE INTEGRATION my_s3_integration
TYPE = EXTERNAL_STAGE
STORAGE_PROVIDER = 'S3'
STORAGE_AWS_ROLE_ARN = 'arn:aws:iam::123456789012:role/MySnowflakeRole'
ENABLED = TRUE
STORAGE_ALLOWED_LOCATIONS = ('s3://my-bucket-name/');
STORAGE_PROVIDER: Specifies that the storage provider is S3.
STORAGE_AWS_ROLE_ARN: Defines the ARN of the IAM role in AWS that Snowflake will use to access S3.
STORAGE_ALLOWED_LOCATIONS: Indicates the specific path of the S3 bucket where the data will be stored.
2. Now we create different external stages that point to specific locations in S3, using the previously configured integration and specifying the file format.
CREATE OR REPLACE STAGE my_bronze_stage
URL = 's3://my-bucket-name/bronze/'
STORAGE_INTEGRATION = my_s3_integration
FILE_FORMAT = (TYPE = 'PARQUET');
CREATE OR REPLACE STAGE my_silver_stage
URL = 's3://my-bucket-name/silver/'
STORAGE_INTEGRATION = my_s3_integration
FILE_FORMAT = (TYPE = 'PARQUET');
CREATE OR REPLACE STAGE my_gold_stage
URL = 's3://my-bucket-name/gold/'
STORAGE_INTEGRATION = my_s3_integration
FILE_FORMAT = (TYPE = 'PARQUET');
URL: Specifies the exact location in the S3 bucket where the data will be stored for each stage.
STORAGE INTEGRATION: Refers to the previously configured integration.
FILE FORMAT: Defines that the data will be stored in Parquet format.
2. Downloading Data Using COPY INTO
Once the stages are configured, data can be downloaded from tables in Snowflake to storage in S3. We will use the “COPY INTO” command:
COPY INTO @my_bronze_stage/customer_data
FROM (SELECT * FROM my_database.public.customer);
COPY INTO @my_silver_stage/order_data
FROM (SELECT * FROM my_database.public.orders);
COPY INTO @my_gold_stage/summary_metrics
FROM (SELECT * FROM my_database.public.orders);
The standard practice is not to apply any filters if we are performing a migration/decommissioning (we replicate everything).
In the example, we are copying all the data from each table and following a traditional Bronze, Silver, and Gold structure. Some clients may have more layers depending on how they process their data. This data export process can be a bit laborious, but it is straightforward.
With thorough prior analysis and a complete mapping of schemas/tables, there should be no complexity. The “laborious” part can be mitigated with an “accelerator” tool that allows automating part of this process.
3. Migrating and/or Repointing from Snowflake to Databricks Using Tools like Fivetran
For users utilizing tools like Fivetran, it is advisable to continue using it as it is a fantastic tool that works excellently within the Databricks ecosystem. So, what should you do? The process is straightforward, and once again, we face different options that can be complementary. The first option is to use Fivetran’s native connectors for Snowflake, which allow you to sync tables and views directly with Databricks easily. This option is ideal for customers who wish to keep certain workloads in Snowflake while taking advantage of Databricks’ capabilities for other processes.
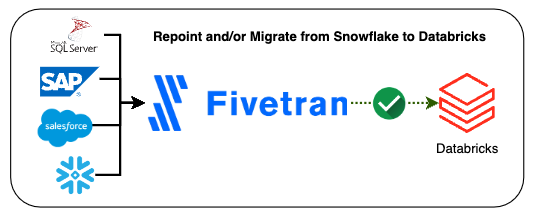
Source: SunnyData
The second option is to fully migrate the data to Databricks by changing the destination in Fivetran. To do this, you need to create a new destination, recreate all connections to Databricks, and run a data sync to the new destination. Once the sync is completed, it is essential to validate that the information has been correctly replicated and then update your reporting and analytics applications. Finally, the connections to the previous destination (Snowflake) are deactivated.
It’s important to highlight that both practices are fully compatible, and in fact, this is the recommended approach, representing the reality of these types of projects in practice.
Once one of these phases is complete, we will have the data securely stored in Cloud Storage.
Reading Data in Databricks
The data exported to Cloud Storage must be read from Databricks, and this can be done using 1) Auto Loader, 2) the “COPY INTO” command from Databricks, or 3) the Spark Batch Streaming API. The choice of which method to use will depend on the scenario and the migration strategy (there is also a subjective component that we will discuss now). By scenario, I mean whether there is a one-time load or not, incremental loads, real-time or batch loads, etc., as well as best practices.

Source: SunnyData
For example, if we are performing a migration where new data will not continue to be ingested (One-time load), it could be done using ‘COPY INTO,’ but also with Auto Loader or Spark APIs. Many engineers use ‘COPY INTO’ when working with thousands of records and Auto Loader when processing millions of records.
Note: While there are various ways to ingest data, such as using Snowflake’s own connectors for Spark, we prefer to share our recommendations based on what we find to be most efficient, drawing from our personal experience and Databricks’ best practice guidelines.
Let’s proceed with an example using code to explain what we’ll be doing here:
1. We’ll create a Schema (or Database):
CREATE SCHEMA IF NOT EXISTS my_catalog.silver_layer;
and the corresponding tables (here I’m simulating creating 3 tables):
CREATE TABLE IF NOT EXISTS my_catalog.silver_layer.customers;
CREATE TABLE IF NOT EXISTS my_catalog.silver_layer.orders;
CREATE TABLE IF NOT EXISTS my_catalog.silver_layer.line_items;
2. We’ll load the Historical Data (I’ll use COPY INTO and only do it for the first table):
COPY INTO my_catalog.silver_layer.customers
FROM 's3://<some-bucket>/silver/customer/'
FILEFORMAT = PARQUET
FORMAT_OPTIONS ('mergeSchema' = 'true', 'header'='true')
COPY_OPTIONS ('mergeSchema' = 'true');
COPY INTO: Copies the data from the files in S3 into the specified tables in the silver_layer schema.
mergeSchema = true: Allows the target table schema to automatically adjust if there are differences with the source file schema.
header = true: Specifies that the first row of the files contains the column names, which is useful for correct data mapping.
We will perform this process with the Silver, Gold layers, and any others we have. Needless to say, the code is a simplification. When creating a table, the column names, data types, etc., and any other necessary adjustments will need to be replicated.
“Congratulations! We now have the data in the Databricks Lakehouse.
Data Modeling: (Difficulty: ❅❅❅ out of ❅❅❅❅❅)
As stated by Databricks on their website, Medallion Architecture provides a logical structure for organizing data. In fact, it doesn’t have to be limited to the three main layers. Each company can adapt it to its needs and data workflows, adding more layers if deemed necessary.

Source: SunnyData
In most cases, the data model does not change when migrating from one platform to another. However, during the migration, it is recommended to map the data model to visualize how the migrated model would look in Databricks. Typically, everything will remain the same, but this can be a good opportunity to evaluate your data strategy.
This is why we have not assigned a difficulty rating to this phase. Usually, nothing will need to be done here, and this phase will be short. If you are using a dimensional model (Star Schema), you can continue using it. The same applies if you are using Data Vault or any other model. However, it is also good to know that any data strategy (such as Data Mesh or Data Fabric) is possible in Databricks.
Code Migration: (Difficulty: ❅❅❅❅ of ❅❅❅❅❅)
This is the most challenging part. When it comes to migrating pipelines, Databricks recommends using native tools wherever possible (such as Auto Loader, DLT, Workflows, etc.) to fully leverage the platform’s capabilities.
However, if you were already using tools like Prophecy or dbt in Snowflake, it’s best to continue using them, as they are also well-integrated with Databricks and can make the transition smoother (simply repoint existing pipelines to Databricks SQL Warehouse).

Source: SunnyData
For data ingestion, if you were using Fivetran in Snowflake, you can continue doing so. The only adjustment needed is to reconfigure the ingestion pipelines to store data in Delta format. Similarly, if you were using Snowpipe, replacing it with Auto Loader in Databricks is a straightforward transition since the two tools are conceptually equivalent.

When it comes to code, Spark is based on ANSI SQL and offers good compatibility with most SQL engines. However, we all know that there are differences in syntax between different platforms. For this, the best approach is to use open-source tools like SQLGlot or to leverage accelerators that can speed up the process and translate the code. At SunnyData, we have worked on initiatives based on LLMs to address this need.
Example of Pipelines (SQL) for Data Transformation from our RAW table to Silver:
CREATE OR REPLACE TABLE my_catalog.silver_layer.customers AS
SELECT DISTINCT
c.customer_id,
c.customer_name,
c.customer_address,
c.customer_phone,
c.customer_email,
c.account_balance,
c.customer_comment,
n.nation_name AS nation_name,
r.region_name AS region_name,
CASE
WHEN c.market_segment = 'AUTOMOBILE' THEN 'Car Enthusiast'
WHEN c.market_segment = 'BUILDING' THEN 'Construction'
WHEN c.market_segment = 'HOUSEHOLD' THEN 'Home Products'
ELSE 'Other'
END AS customer_segment_group
FROM my_catalog.bronze_layer.customers c
JOIN my_catalog.bronze_layer.nations n ON c.nation_key = n.nation_key
JOIN my_catalog.bronze_layer.regions r ON n.region_key = r.region_key;
Next, we need to focus on optimizing the performance of the new environment. While replicating the code as-is can help identify issues during data validation (a recommended practice to spot any discrepancies), optimization tasks will still be necessary as part of the migration. Just because the code performs well in one data warehouse doesn’t mean it will do the same in another. The key is to carefully review the best practices provided by Databricks and ensure they are applied. Taking the time to optimize will ensure the migration is successful and the system runs efficiently.
Data Validation: (Difficulty: ❅❅ of ❅❅❅❅❅)
Validating that your migrated tables contain the same data as the one in your legacy system can be a daunting task, especially when you have a large number of tables to migrate. Luckily, we got you covered! At SunnyData we’ve built accelerator tools to help alleviate much of this burden, automatically comparing the source and target tables with a comprehensive suite of tests ranging from exact row by row comparison to column level statistical distributions. What used to be a tedious manual verification task can now be run on rinse and repeat and help you build the confidence needed in the correctness of the new platform.
Report Modernization: (Difficulty: ❅ out of ❅❅❅❅❅)
When migrating data to a new platform or system, you may need to redirect BI reports to use the new data sources. One of the most common methods to achieve this is by testing a few sample reports first. If everything looks good, you can then simply update the data source or table names in the existing reports to point to the new data locations.
There are two possible scenarios:
If the table and view structure (schema) has not changed: The process is fairly straightforward. You only need to update the configuration in your BI tool to point to the new database or tables. Since the schema remains the same, you shouldn’t need to make significant changes to the reports or dashboards. It’s just a matter of updating the connection to the new database. Also, if you keep the dataset name the same in PowerBI, you can simply replace it, and everything will continue to work as usual, assuming all other elements are unchanged.
If the table structure (schema) has changed: This scenario is a bit more complex. You will need to adjust the tables or views in the new data environment to match the schema expected by the reports. This might involve creating new views or modifying existing ones so that they align with the structure that the dashboards require.
Conclusions
Migrating from Snowflake to Databricks is not a complex process. At SunnyData, we have extensive expertise in Snowflake, and we can facilitate the complete transition to Databricks if you are still using Snowflake as your data warehouse.
We highly recommend downloading the following migration guide from Snowflake to Databricks: Snowflake vs. Databricks Migration Guide. This guide offers a broader perspective and covers critical steps prior to the technical migration process, such as conducting a thorough discovery, assessment, mapping workshop, architecture design, and more.
We look forward to assisting you in your migration journey. Until next time!